Wednesday, July 6, 2016

How To Do A Wash-In: Part 2

Today, I'm going to finish the lesson on how to finish a painting with a wash-in as an underpainting.
Here's a quick recap of the method:
Draw the design on the canvas in pencil. Spray with Crystal Clear Fixative. Let dry. Apply Burnt Umber to the canvas with a thin medium of 50/50 turpentine & linseed oil. Wipe the canvas with cheesecloth or an old tee shirt to remove the excess oil to make a smooth, evenly toned canvas.


Draw in your darks with a brush, wiping out the light areas with your rag or a brush dipped in turpentine.
Once you have the wash-in rendered to the best of your ability, set it aside to dry overnight. You now have a lovely monotone sketch to use as an underpainting for the finished oil painting.


The first thing I do is prepare my palette. I have a specific order as to where I put the colors. The subject will dictate the final selection of the colors, meaning I may add a color that I don't normally use, such as cobalt blue for clouds or a sky, but I have a standard palette of 12 colors. I added manganese violet a few years ago when I discovered it was green's perfect complimentary color for landscape painting. It essentially turns the chroma or intensity of the color down a few notches.


Here's my palette: From left to right, Titanium Everwhite, French Ultramarine Blue, Cerulean Blue, Viridian Green, Manganese Violet, Alizarine Crimson, Cadmium Red Light, Cadmium Yellow Barium Medium, Cadmium Barium Orange Medium, Burnt Sienna, Yellow Ochre and Burnt Umber.
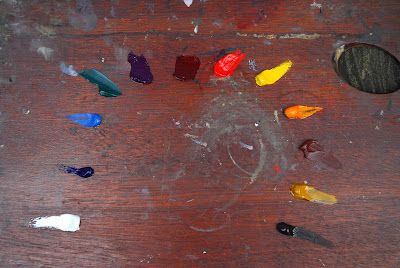
Notice, there's no black on my palette. After I discovered I could mix a deep, rich black from burnt umber and ultramarine blue, a la Anders Zorn, I went cold turkey and removed black and all its variations from my palette. A student once asked me what I had against black. I had to think about that for a minute. I don't like black because it seems so one-dimensional. By that I mean it's a neutral black. By mixing different amounts of ultramarine blue and burnt umber, you can tweek the temperature. More blue will make it cooler, more umber will make it warmer. You can make lighter versions of black (I think it's called gray) by combining cerulean blue or burnt sienna or any variation of blue and brown. I know Sargent had black on his palette. After a steady diet of looking at Munnings' paintings for a few years with his bright colors, I was alarmed to see how much black was in Sargent's flesh tones!


Once my palette is done, I'm ready to go. I use linseed oil as a medium for thinning oil colors, and turpentine to clean my brushes. I also use Liquin as a drier if I need something dried in a hurry. It leaves a shiny gloss to the surface, and some very well known landscape painters tout it as a varnish! It clearly states on the bottle, "Do Not Use As A Varnish." I have no idea what it will do to the layers of paint in various states of drying underneath the top layer of Liquin, so I just heed the label's warning and urge all my reader to do likewise, regardless of what the workshop instructor says! These artists are ignoring the tenets of the manufacturer's recommendations without knowing what will happen to their paintings in 50 or 100 years. To them I say, "Good Luck!"
Okay, so where should I start? I start with the background. Here's where I use Sanden's method of relating the darkest areas of the grass to the middle-value areas, and then the middle-value areas to the light areas. It's a tried and true method and you won't go far wrong if you keep relating the values of one mass to another.
I proceed with this method until I have all the large masses of the grass painted in. There's no detail yet. I used to have to squint to blur the details, but now I just paint without my glasses during this phase. Really!
As the grass area takes shape, I paint in the trees and shadows behind the main figures as well. This brings the painting together because I'm using the same colors I used for the grass.
I add ultramarine blue and burnt umber for the dark shadows of the tree trunks in the background. To this I'll add some white, manganese violet and yellow ochre for that lovely light & shadow patch in the upper left-hand corner. The tree trunks are a mixture of cadmium red light, ultramarine blue and white. The background now has all the large background masses broadly painted in (below).
I'm now ready to start the large masses on the hounds. I'll start with the dark areas of the main hound, including the tan or brown markings on his back, ears and face. I'll move on to the white areas that are in shadow after that. Sanden used to say "Paint with the largest brush possible," and that's great advice. It keeps you from getting caught up in painting small details before they're needed.

You can see at this stage (above) that some of the details are beginning to appear, but note the broad areas of white and black in the hound and compare them to the same areas in the finished painting below.


The finishing touches, such as the blades of grass, the eyes and dappled sunlight are painted after the paint has dried. These details can be overworked if you're not careful, so add them sparingly. That just might be a great subject for another post: "The Kiss of Death; Overworking a Painting," along with the blog on warm and cool in color mixing. But that's all for now!


Please send any questions you have about my techniques. I'd be happy to answer them.


Monday, July 4, 2016

How To Do a Wash-In: Part 1

In this post, I'm going to demonstrate a classical oil painting technique known as a "wash-in". In my next post, I'll do a step by step demonstration of how I develop the painting from this monochromatic underpainting to a finished oil painting. I'm using my latest work, "A Shady Spot" for the lesson. The painting was done on a prepared wooden panel and was painted in two days.
Today's Lesson: How To Do a Wash-In.
I've always maintained that I'm self-taught. However, I briefly studied with two teachers at opposite ends of the spectrum; one was a French Academic painter and the other a thoroughly modern a la prima portrait painter.
I was trained in the French Academic style by Michael Aviano. I studied with him for only a short time - a year perhaps, maybe even less - but it was with him that I learned how to see and paint values. It was the single most important discovery of my entire art education, for it enabled me to break down the three-dimensional world into a two-dimensional language - the language of light and dark values. When I first arrived at the school, I was given gray casts from which to work. I drew from them and also from black & white photographs. It was kind of boring and I was impatient to get on with the business of painting pictures in color. Eventually, I was allowed to mix a string of eleven gray values from black to white. With this palette, I painted pictures of classical casts of hands and figures which were also gray. I was finally given the eleven gray balls assignment, developed as the ultimate test of a student's ability to see and paint values of light and dark. It was a gray board with 11 tennis balls, painted in graduated shades of gray and arranged from the whitest white on top to the darkest black on the bottom. The balls were lit with a strong light source coming from the side, which cast dark shadows on the gray, middle-value background. It was a good exercise and I had been working diligently on it for about three or four days, when I decided I'd had enough of this pussy-footing around and just finished it. Now you have to realize that there were students there who had worked on this thing for an entire month! I never could understand what all the fuss was about. I don't know if the monitor just thought I was beyond help or a genius, because there was no criticism of my finished painting. Here's a photo of the painting to illustrate the difficulty of the task.

I never got around to painting in color at Mr. Avaino's atelier. Mixing strings of color a la the Munsel System is extremely laborious and boring. Oil of cloves is added to keep the paint wet on the palette for weeks at a time. Students spend countless hours mixing "strings" or rows of exact colors of paint, lighten or darkened with black or white, from which they will later select the exact color for an area in their painting. I was in a big hurry to be painting and decided after the initial lessons on values that I was ready to paint in color. Ah, the follies of youth! It's reminds me of when I was a child and I wanted to learn how to play the piano. When I couldn't play a Chopin etude after a few weeks of lessons and practicing scales, I gave it up!
Shortly after leaving Avinao's atelier, I went to the Art Students League to study portrait painting with John Howard Sanden. An excellent draughtsman and slick painter, Sanden continued the value system I had learned in a much more immediate fashion. No tinted background for him - he painted directly onto a white canvas. His system was to relate all the values to each other, starting with a simple drawing, and proceeding to paint areas as they related to one another, i.e., the background as it related to the shadows of the hair, the hair as it related to the shadows of the face and so on. I still find painting directly onto a white canvas a bit too jarring for my eye, so I've wedded the two styles to suit myself, taking the a la prima method of applying the paint with the biggest brush possible, and combining it with the atelier method of doing a wash-in underneath. It works well for me. In Sanden's class, the model would usually keep the same pose for the entire week. I often did a new painting every night, moving my easel around the room to paint the same pose from different angles. I studied with Sanden for one year. It was great training.

Cherry picking techniques from your teachers is something I can never stress enough. Take what you like from each one. Don't follow any one teacher slavishly. Absorb what each has to offer and move on. Too many students copy their teacher's methods and never develop their own style. Of course, it goes without saying that you have to master the techniques being taught before you can integrate it into your work or discard it. For example, I used Sanden's palette for many years, even after I had switched from painting portraits of people to those furry, four-legged creatures! At some point, I discovered Anders Zorn's palette of only five colors. At first, I was amazed at the range of colors and values one can achieve with such a paltry number of colors. Then it made me realize I hadn't altered my palette even when the subject demanded it. Astonishing!
About 10 years ago, I attended a lecture by Andy Goldsworthy in Purchase, NY, while visiting some artist friends. He's a conceptual artist who uses natural materials to alter the environment. He once made a giant snowball, put it in a freezer and took it out in the middle of London in July. He lined the top of a stone wall with sheep's wool to make it look like snow. You get the idea. He started the lecture by telling the audience he "loved working with his hands". Everyone oo-ed and ah-ed right on cue, while I was thinking to myself, "Oh boy, this is going to be a long afternoon!" To my credit, I stayed, listened and took away one of the most important lessons I've ever learned. He got me thinking about the importance of conceptualizing the idea before creating the work. He turned out to be one of my most important influences, though I never would have imagined it at the beginning of the lecture. He helped me to realize all the technical ability in the world isn't enough. You have to have some idea of what it is you want to say. Finding your voice is as important as learning to mix colors. It sounds corny, I know, but it's true.
Okay, now let's get to the wash-in.
The reason I use a wash-in is simple. First of all, it gives the canvas a warm, even tone, and helps tie the painting together. If you miss some spots, there's no glaring white canvas showing through the paint surface. Some people like that effect, but I'm definitely not one of them. If you study the works of the Old Masters - Rubens, Landseer, etc., you'll see they all toned their canvases beforehand. Most importantly, it provides a road map of the painting for you to follow. It has the drawing all figured as well as the light and dark values. Finally, unfinished sketches or studies always look so much better on a toned background!


Let's start with a 12" x 16" support (canvas, canvas board, gessoed panel, etc.). In pencil, draw your design onto the blank canvas. Make it dark enough to be visible under the tone. I prefer to draw directly on the canvas after I've applied the tone (see below), but I recommend most of you draw it in pencil first. Spray the drawing with Crystal Clear fixative, and let it dry completely, otherwise the lines will disappear when you apply the tone. Squeeze a small amount of Windsor & Newton Burnt Umber onto your palette. In a small palette cup or glass or metal container, mix equal parts (approximately1 tablespoon each) of linseed oil and turpentine. The amount of oil paint and medium will depend on how large the canvas is. Take a large #6 bristle brush (I use Robert Simmons Signet Filberts) and dip your brush in the linseed oil/turps mixture. Mix it with a small amount of the brunt umber and brush it onto the canvas, starting at one corner and extending the area as you apply the medium and paint to your canvas. When you've covered the entire surface, it will look very dark. Take a piece of cheesecloth (any hardware store) or an old T-shirt (no paper towels, as they leave small bits of lint on the surface) and wipe the surface in smooth, even strokes. This will remove some of the paint, leaving an even, middle-value brown tint on the canvas (shown above).
 
While it's still wet, draw in your design with a smaller brush. Wipe out the lighter areas with your rag or with your brush dipped in turpentine, and apply more paint to the darker areas (above left and right). Continue until you have all the lights and darks where you want them (below right). Remember, you'll be covering this monotone drawing with color once the paint dries, so the drawing has to be as good as you can get it at this stage. The paint will be
dry in a day or two and you can then apply your color.
I use a brown wooden palette to correspond to wash-in, which facilitates seeing the values and colors more easily. Remember my post "Out In the Field - An Improvement" (4/29/16) about how the same color looks completely different on different backgrounds?  If you have a toned canvas and a white palette, the color you mix on the white palette will be wrong when it's applied to the canvas, unless you're a very experienced painter. So make it easy on yourself and use a palette that matches your canvas.
If you decide this is all too time-consuming or you just prefer to work directly on a white canvas, you'll want to use a white palette for mixing your colors, since it directly corresponds to your white canvas.
Here's the finished wash-in. I just have to wait until it dries and I'll be ready to apply my color!
In my next post, I'll show you how I mix my colors and apply them to the canvas.
 
The finished wash-in, left on the easel to dry overnight.